

Installing Your Wood Countertop
Wood is a natural material that is subject to changes in moisture and temperature. It moves and changes ever so slightly when exposed to humidity, heat, and cold. These movements are small, but they do happen. Your wood countertop must be installed to allow for the ongoing movement of a wood top. Preventing it from moving will cause the top to crack.
Installation can be easily accomplished by a construction specialist or a handy homeowner.
Preparing the Top for Installation

We do not include screws with the countertop because there are many variations in how long the screw should be in securing the countertop to the cabinetry. You will need a good-quality wood screw that is long enough to go through the corner block (or other attachment device) and penetrate the wood countertop to at least one half of the thickness of the top.
Dishwashers, Washing Machines, Undercounter Appliances, and Built-In Ovens
A piece of heavy-duty aluminum foil should be attached to the underside of the solid wood top (the shiny side should face the appliance) over any appliance that produces heat or moisture. Aluminum foil on the underside of the top prevents heat and moisture penetration that could cause cracking. The foil should be adhered to the top (3M® brand spray adhesive works well) before it is attached to the cabinets and should cover the whole width of the top and overlap to the adjoining cabinets on either side of the appliance.
Sinks and Faucet Pipes
All sink cut-outs and faucet holes should be carefully sealed with the type of finish that is used on your countertop. If we make the cut-outs on the top and apply the finish, this will be taken care of for you. Any other cut-outs or modifications to the wood top must be sealed as well. Failure to properly seal any cut-out or modification to the wood top will void the warranty.
A thick coating of silicone should be used to seal faucet holes and sinks. Sinks and faucets should be tightly secured to prevent water from penetrating the top.
Multi-piece Tops
If your custom top includes an "L" corner where two pieces are joined together, those pieces should be assembled first.
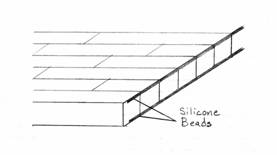
A thin bead of acid free silicone should be applied to the upper and lower edges of any joints to ensure a good seal.
The bottom surfaces of the two pieces to be joined together will each contain a hole with a groove that extends across the joint. These holes will accomodate the FlipBolt® countertop connectors that were shipped with your multi-piece top. A joint will also have Domino® pins which are flat wooden dowels that you will insert into the holes (already pre-drilled for you) on both surfaces of the joint. These dowels allow the countertop pieces to fit together much like a leaf fits into a table.
After the countertop has been properly aligned, insert one FlipBolt® connector into each hole. Then simply hand tighten the nut and lower the flip lever to tighten each bolt. Use a 5/16" wrench if extra tightening is needed. The Domino® pins and the FlipBolt® connectors ensure that your countertop stays perfectly aligned. See the photos below for instructions on installing the FlipBolt® connectors.


Installing your Wood Countertop
The countertop should be attached to the cabinetry by screwing it to corner braces and blocking provided by the cabinetry. Another option for securing the countertop is to use "L" brackets.
In order to allow for the natural movement of the wood, the screw holes in the corner braces and blocking should be drilled to a size barely larger than the screw. You should also use the drill to make the hole through the corner braces an oval shape. Screws should then be used in the center of the holes to secure the top. Hand tighten. Using a slightly larger, oval shaped hole will allow the top to move slightly. See the drawings below.


Do not use glue to secure the wood top. Glue will prevent the wood top from its natural inclination to move and will cause the top to split and crack. Using glue or any kind of adhesive to install the wood countertop will void the warranty.
the top should be attached at every available opportunity including, but not limited to corner blocks, ledger strips, metal brackets, or any other attachment thoughout the length of the top. It should be secured on the front edge, in the middle, and at the back edge of the top.
If needed, DeVos Custom Woodworking will provide further detailed installation instructions for your particular top. If there is any part of the installation or handling of wood tops that you don't understand, please contact us, we are happy to help!